This is an old revision of the document!
−Table of Contents
Victron & BMZ ESS 3.0 / ESS 7.0
The combination of Victron products with the BMZ ESS 7.0 battery has been tested and certified by the R&D departments. The combination is actively supported by both companies.
1. Introduction
1.1 Compatible Victron products
All 48V Multis and Quattros. And always a Venus-device is necessary in the system, since that has the canbus port which is used for the (required!) communication between the ESS battery and the Victron system.
1.2 Notes
- BMZ batteries can only be used in a Victron ESS installation installation that uses the ESS Assistant.
- Paralleling multiple BMZ ESS batteries to expand capacity is possible. Contact BMZ for more information.
- Derating, based on the dynamic BMZ ESS charge- and discharge limits:
- Minimum CCGX version is v1.72
- The derating mechanism is not very precise yet. In other words, do not expect a discharge limit of 30A to result in a precise discharge of 30A.
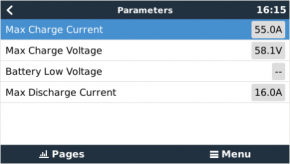
- Actual charge- and discharge limits are visible in the Parameters page. See screenshot below in Chapter 4.
- BMZ batteries and MPPT Solar Chargers with a VE.Can communication port cannot be both connected to the CCGX, because of different canbus speeds. Use Solar Chargers with a VE.Direct comm. port instead.
1.3 System diagram

2. Venus-device needed
To use the BMZ ESS in Victron system, it is necessary to use a Color Control GX or Venus GX. On first commissioning an external power supply (Not the 48V from the BMZ-Battery) is needed. The CCGX/VGX sends a keep alive signal to the BMZ ESS via canbus. This will only be send once the canbus baud rate is changed (see 5. Venus-device Configuration). Without it, the battery will have a communication fault and shut down after 10sec.
3. Wiring of communication cables
Use the VE.Can to CAN-bus BMS type B Cable, part number ASS030720018. Plug the side which is labeled Battery BMS into the BMZ BMS. Plug the side labeled Victron VE.Can into the Venus-device.
Then, plug a VE.Can terminator in the other VE.Can socket on the Venus-device. Two VE.Can terminators are included with the package of the CCGX as an accessory, only one is used. Keep the other one as a spare.
More information about the cable can be found in its manual.
Without properly connecting this cable, the battery will stop charging/discharging after several minutes. Also, the battery will not show up on the display of the Venus-device.
4. VEConfigure settings
4.1 General tab
- Check “Enable battery monitor”
- Enter the battery capacity:
- BMZ ESS 3.0 - 121.5 Ah
- BMZ ESS 7.0 - 121.5 Ah
- The other parameters (“State of charge when bulk finished” and “Charge efficiency”) can be left to their default setting. They are not used in this setup.
4.2 Charger tab
| Parameter | Setting |
|---|---|
| Battery type | Lithium |
| Charge curve | Fixed |
| Absorption voltage | 60.75 V |
| Float voltage | 60.00 V |
| Absorption time | 1 Hr |
Note: make sure to double check the float voltage after completing Assistants, and if necessary set it back to 60.00 V.
4.3 ESS Assistant
Select the fourth battery type:

Then:
- Do not change the dynamic cut-off values, they have already been set correctly after selecting the lithium battery type.
- Sustain voltage: 50V
- Same for the restart offset: do not change that.
5. Venus-device Configuration
- Select the CAN-bus BMS (500 kbits/s) CAN-profile in the Venus-device. Menu path: Settings → Services → CAN-profile. Note that this changes the function of a VE.Can port: it is not possible to connect both VE.Can products and a BMZ battery together on a Color Control GX. Is is possible on the Venus GX
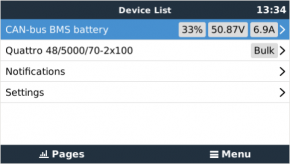
- After properly wiring and setting up, the BMZ ESS will be visible as a battery in the device list:

- The parameters option within the battery page shows the actual battery charge and discharge limits:

DISQUS
~~DISQUS~~
 Add this page to your book
  Remove this page from your book
  Manage book (
 Help
Help