VE.Smart Networking
Reportez-vous au schéma de câblage ci-dessous pour connecter le Blue Smart IP22 Charger (modèle à 1 sortie) à une seule batterie/un seul parc de batteries avec un Smart Battery Sense :
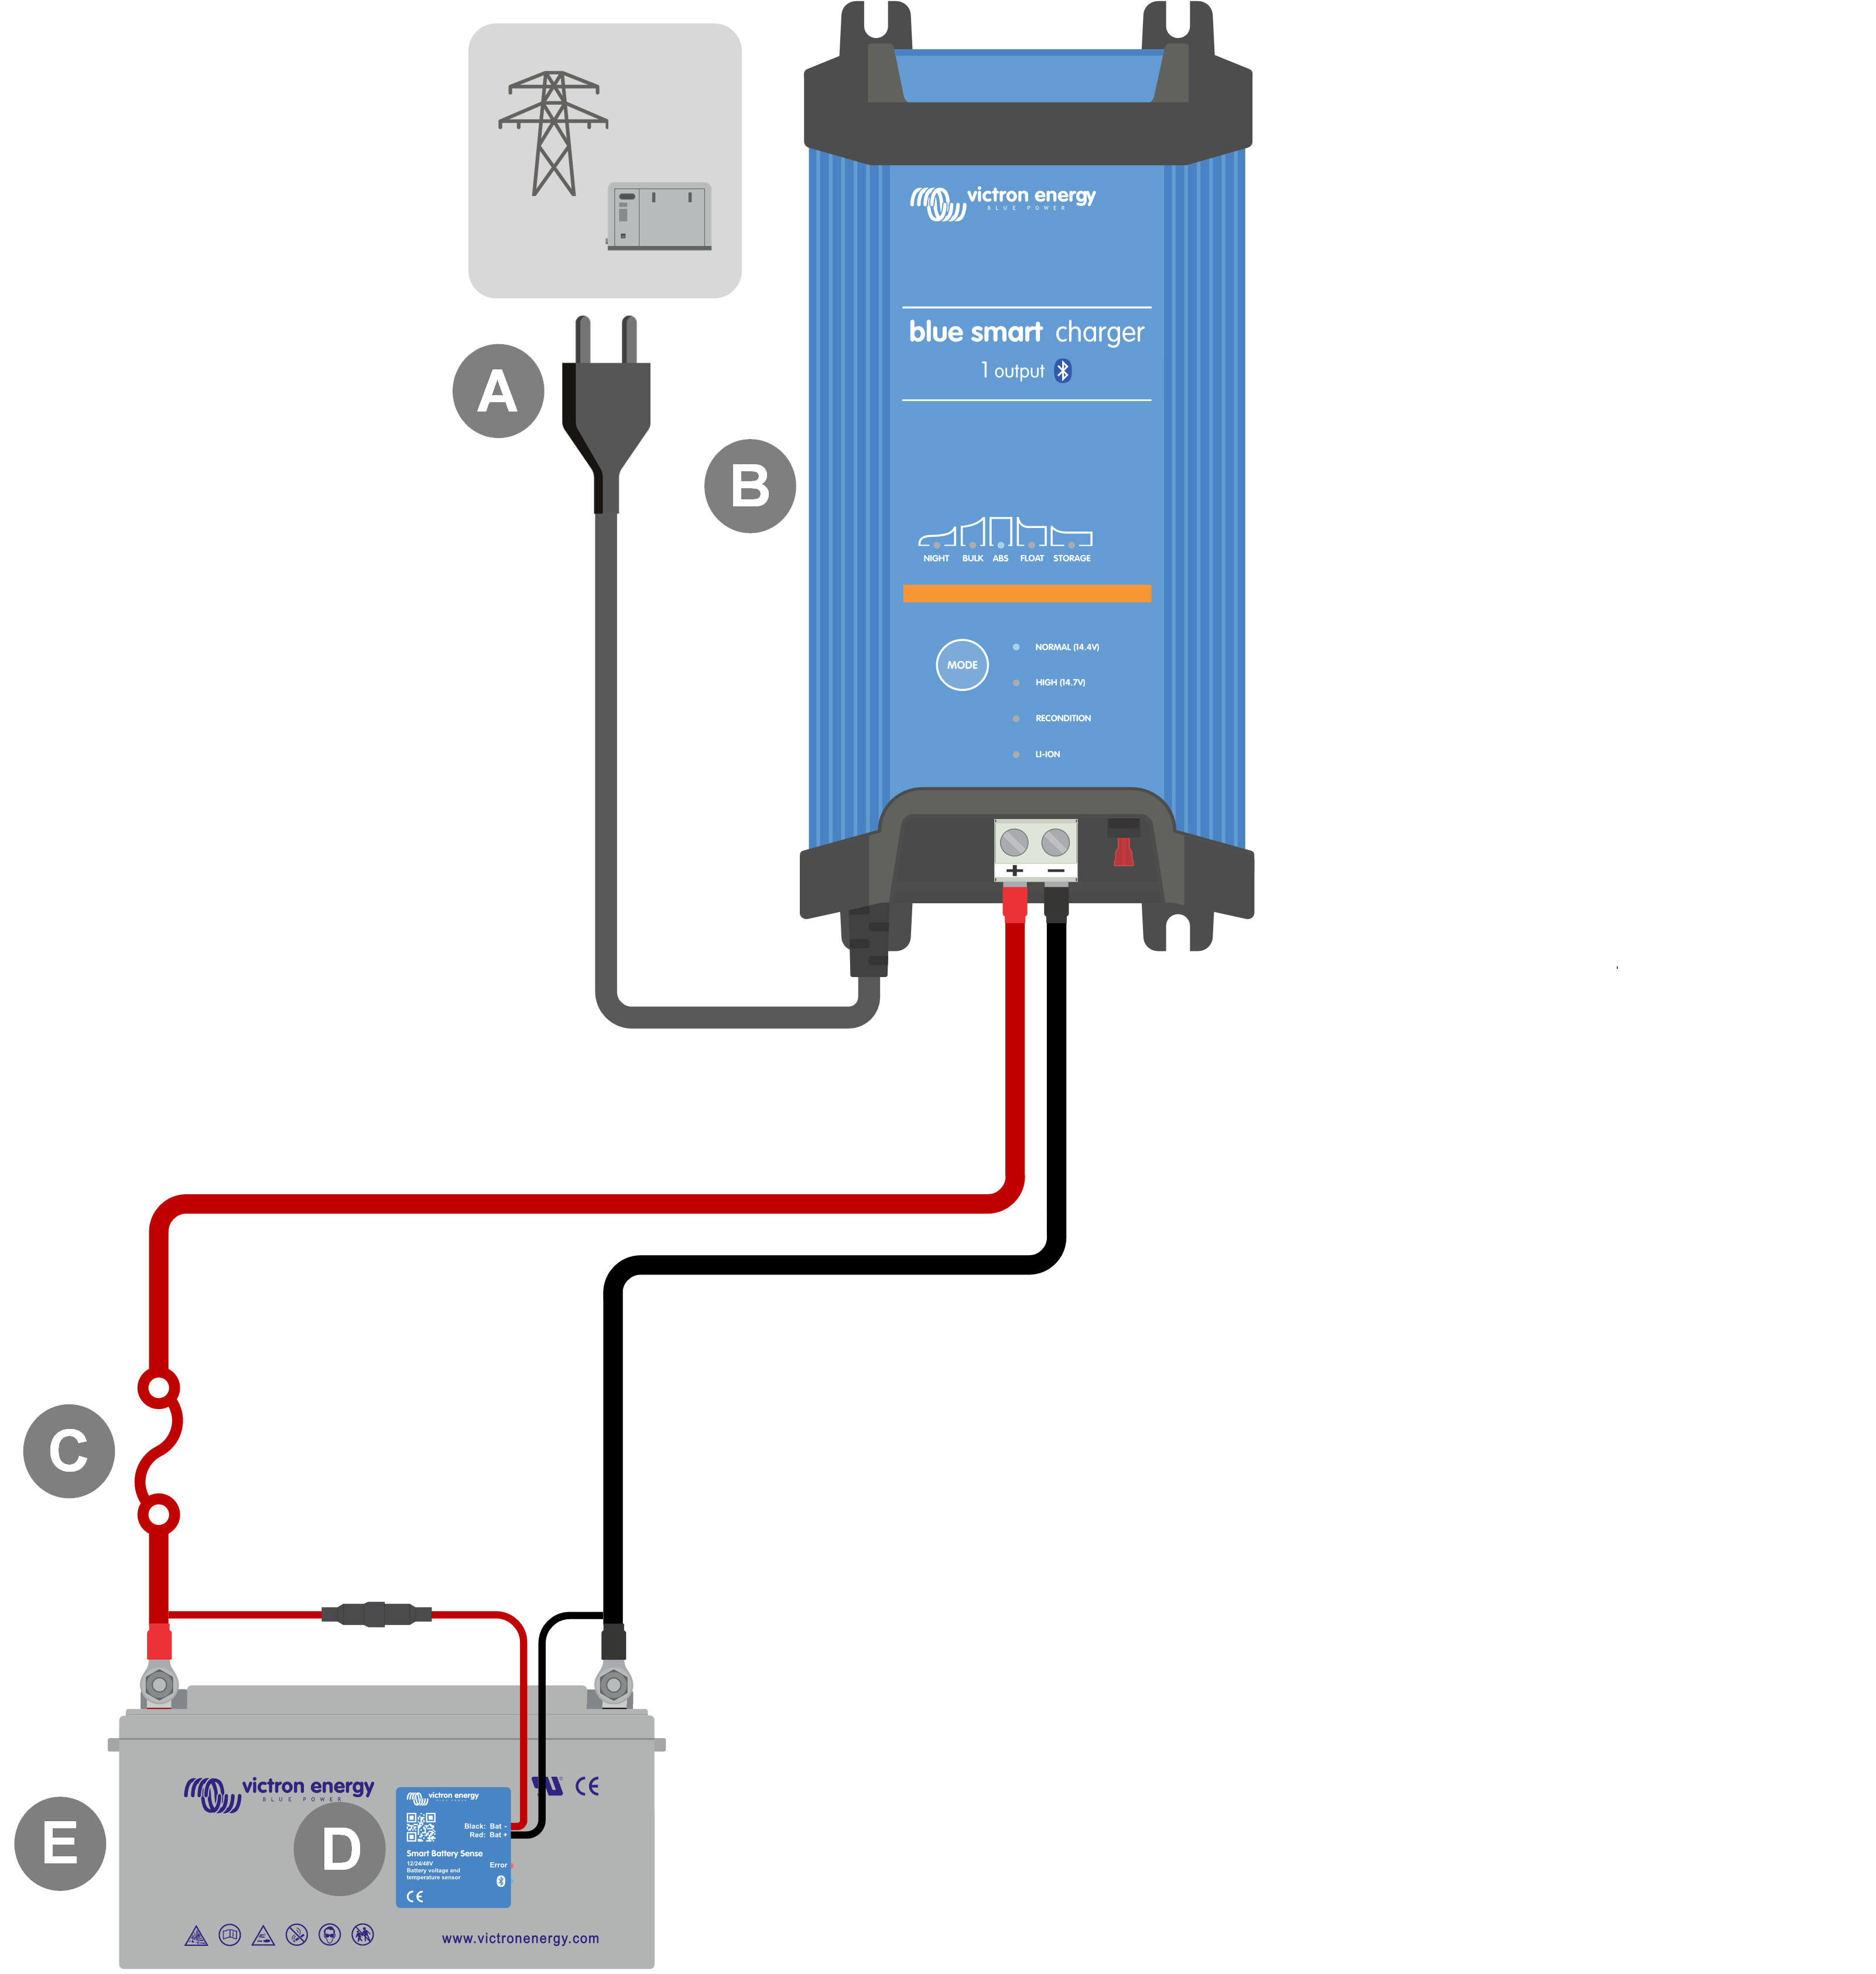
Légende | Description |
|---|---|
A | Alimentation CA (réseau électrique, générateur ou convertisseur) |
B | Blue Smart IP22 Charger (modèle à 1 sortie) |
C | Fusible/disjoncteur (à placer aussi près que possible de la batterie) |
D | Smart Battery Sense |
E | Batterie/parc de batteries |
Avis
Un réseau VE.Smart doit être configuré entre le Blue Smart IP22 Charger et le Smart Battery Sense pour permettre la connectivité Bluetooth et la communication entre les appareils ; reportez-vous à la section « Configuration avancée > VE.Smart Networking» pour plus d’informations.
Reportez-vous au schéma de câblage ci-dessous pour connecter le Blue Smart IP22 Charger (modèle à 3 sorties) à plusieurs batteries/parcs de batteries indépendants avec un Smart Battery Sense :
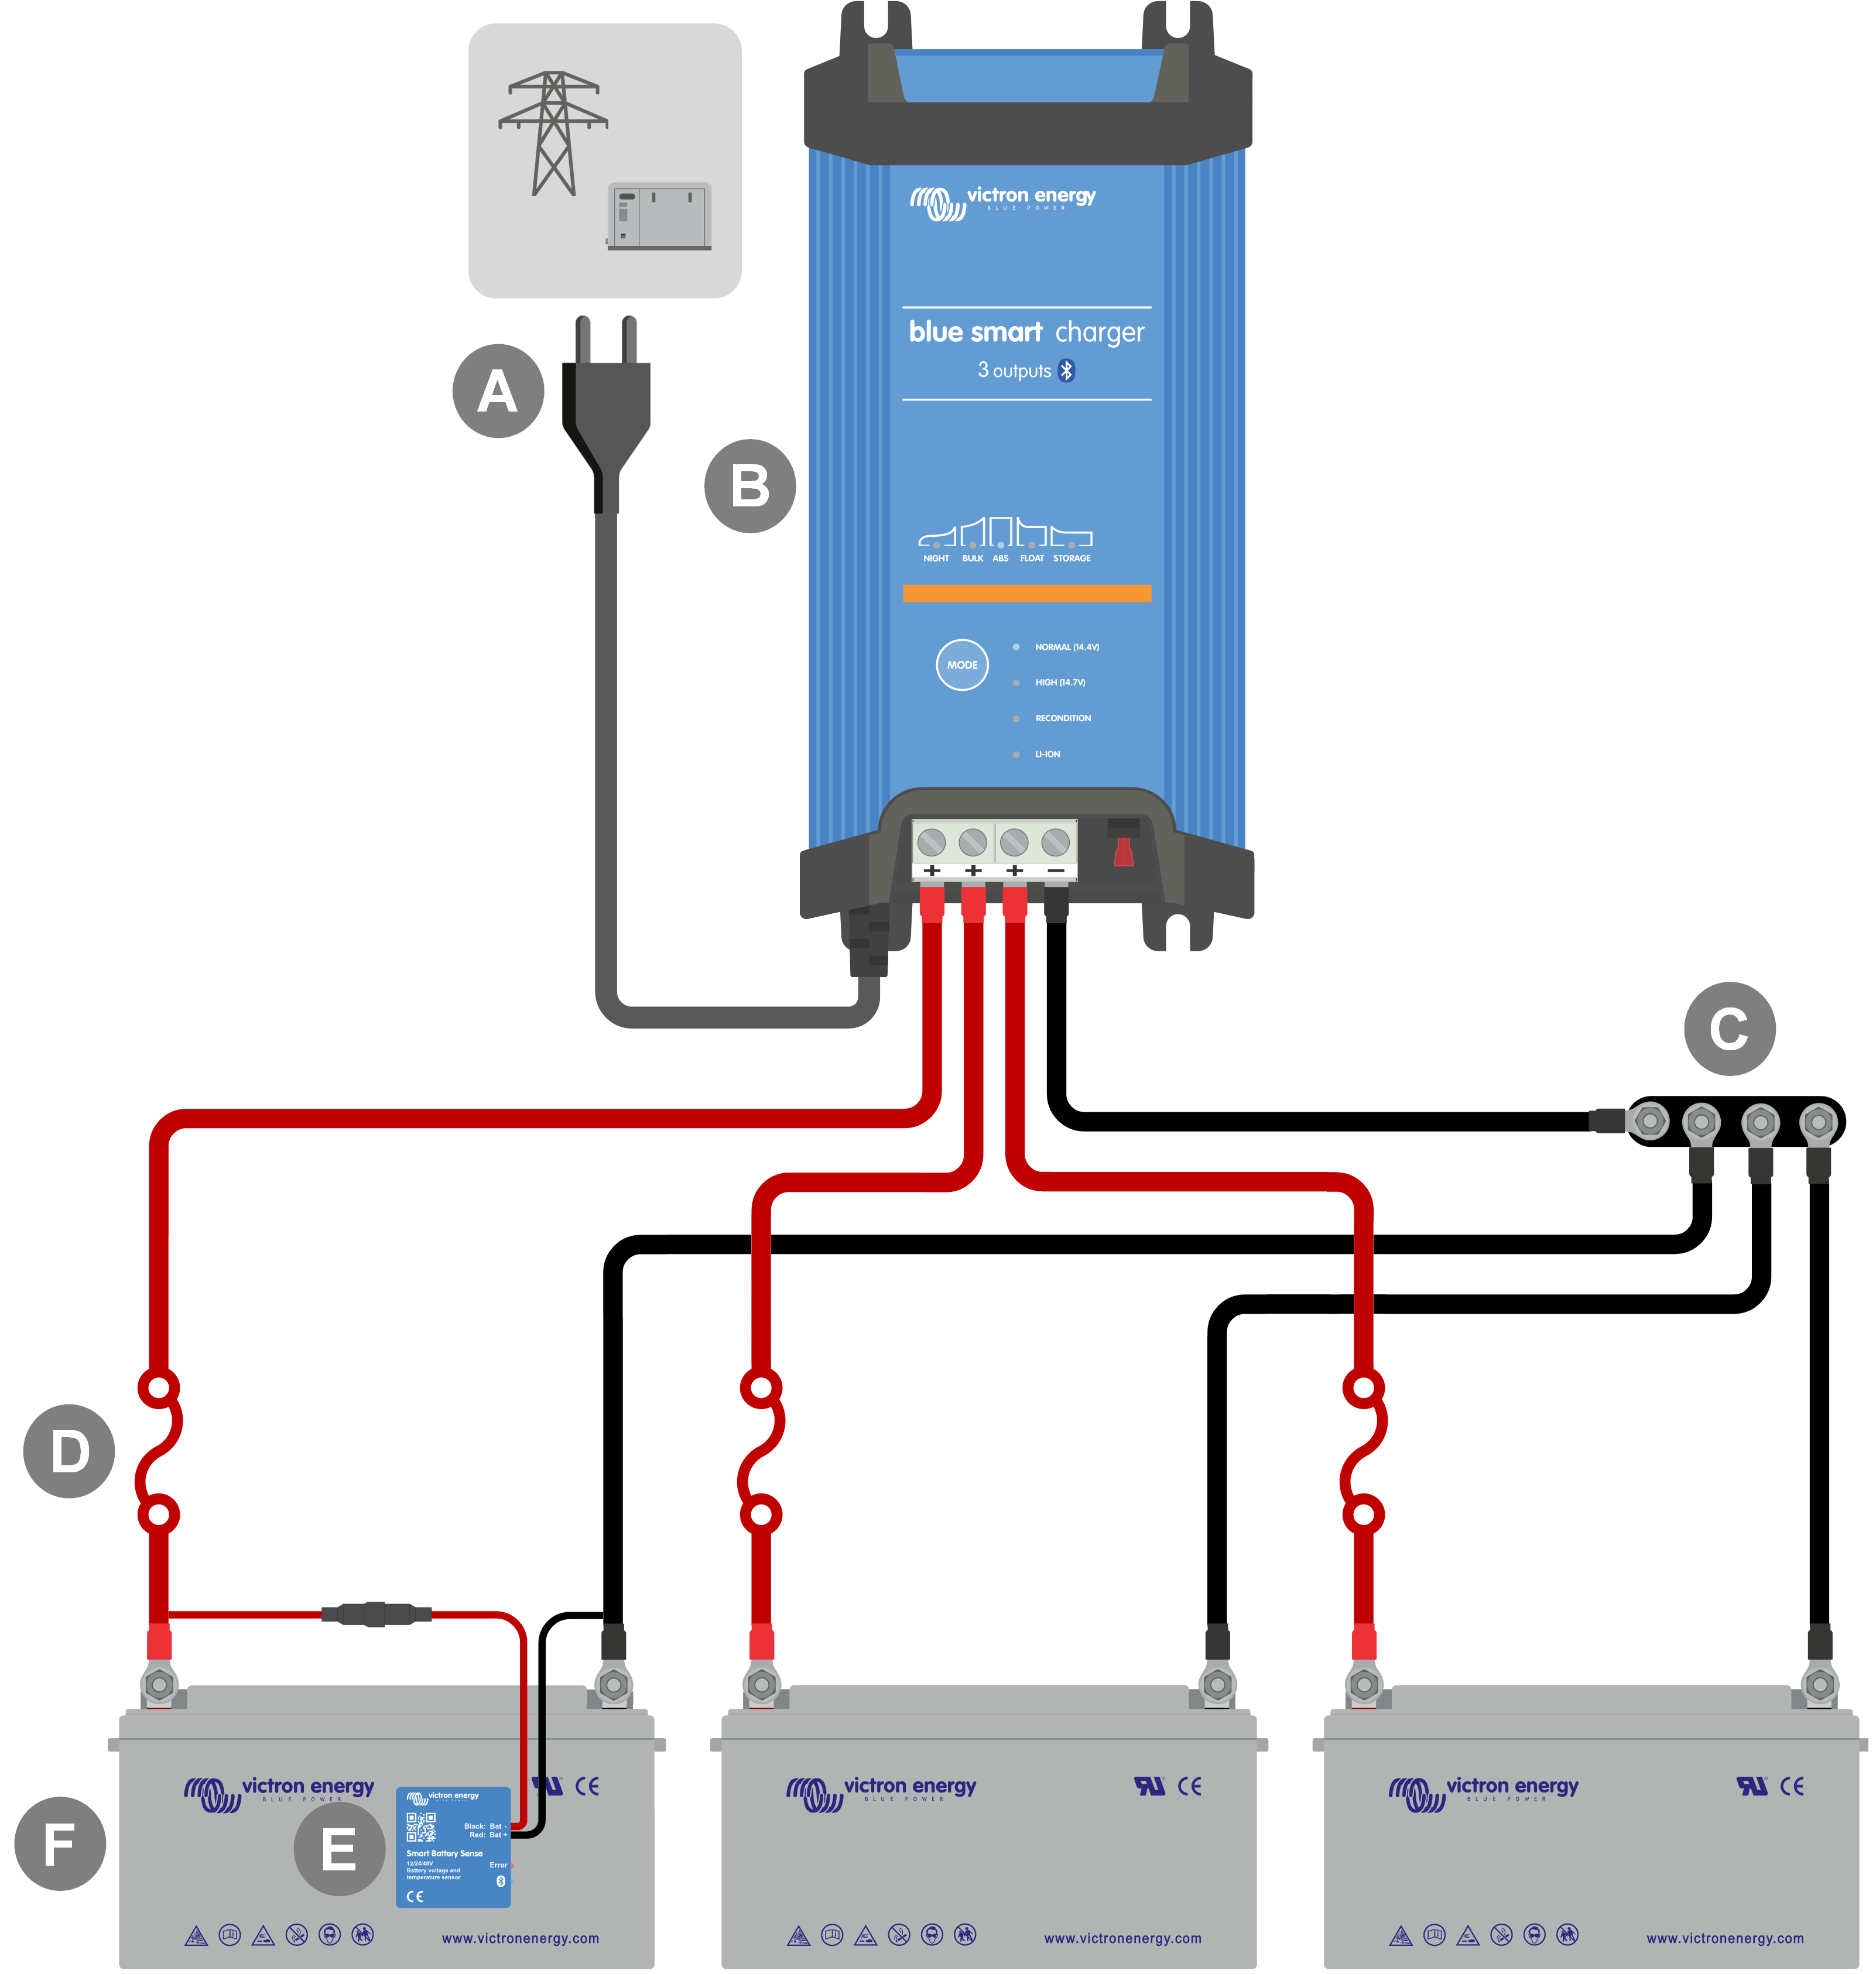
Légende | Description |
|---|---|
A | Alimentation CA (réseau électrique, générateur ou convertisseur) |
B | Blue Smart IP22 Charger (modèle à 3 sorties) |
C | Barre omnibus négative CC |
D | Fusibles/disjoncteurs x 3 (à placer aussi près que possible des batteries) |
E | Smart Battery Sense |
F | Batteries/parcs de batteries x 3 (toute combinaison de 1, 2 ou 3 batteries) |
Avis
Un réseau VE.Smart doit être configuré entre le Blue Smart IP22 Charger et le Smart Battery Sense pour permettre la connectivité Bluetooth et la communication entre les appareils ; reportez-vous à la section « Configuration avancée > VE.Smart Networking » pour plus d’informations.
Reportez-vous au schéma de câblage ci-dessous pour connecter le Blue Smart IP22 Charger (modèle à 1 sortie) à une seule batterie/un seul parc de batteries avec un SmartShunt ou un contrôleur de batterie BMV :
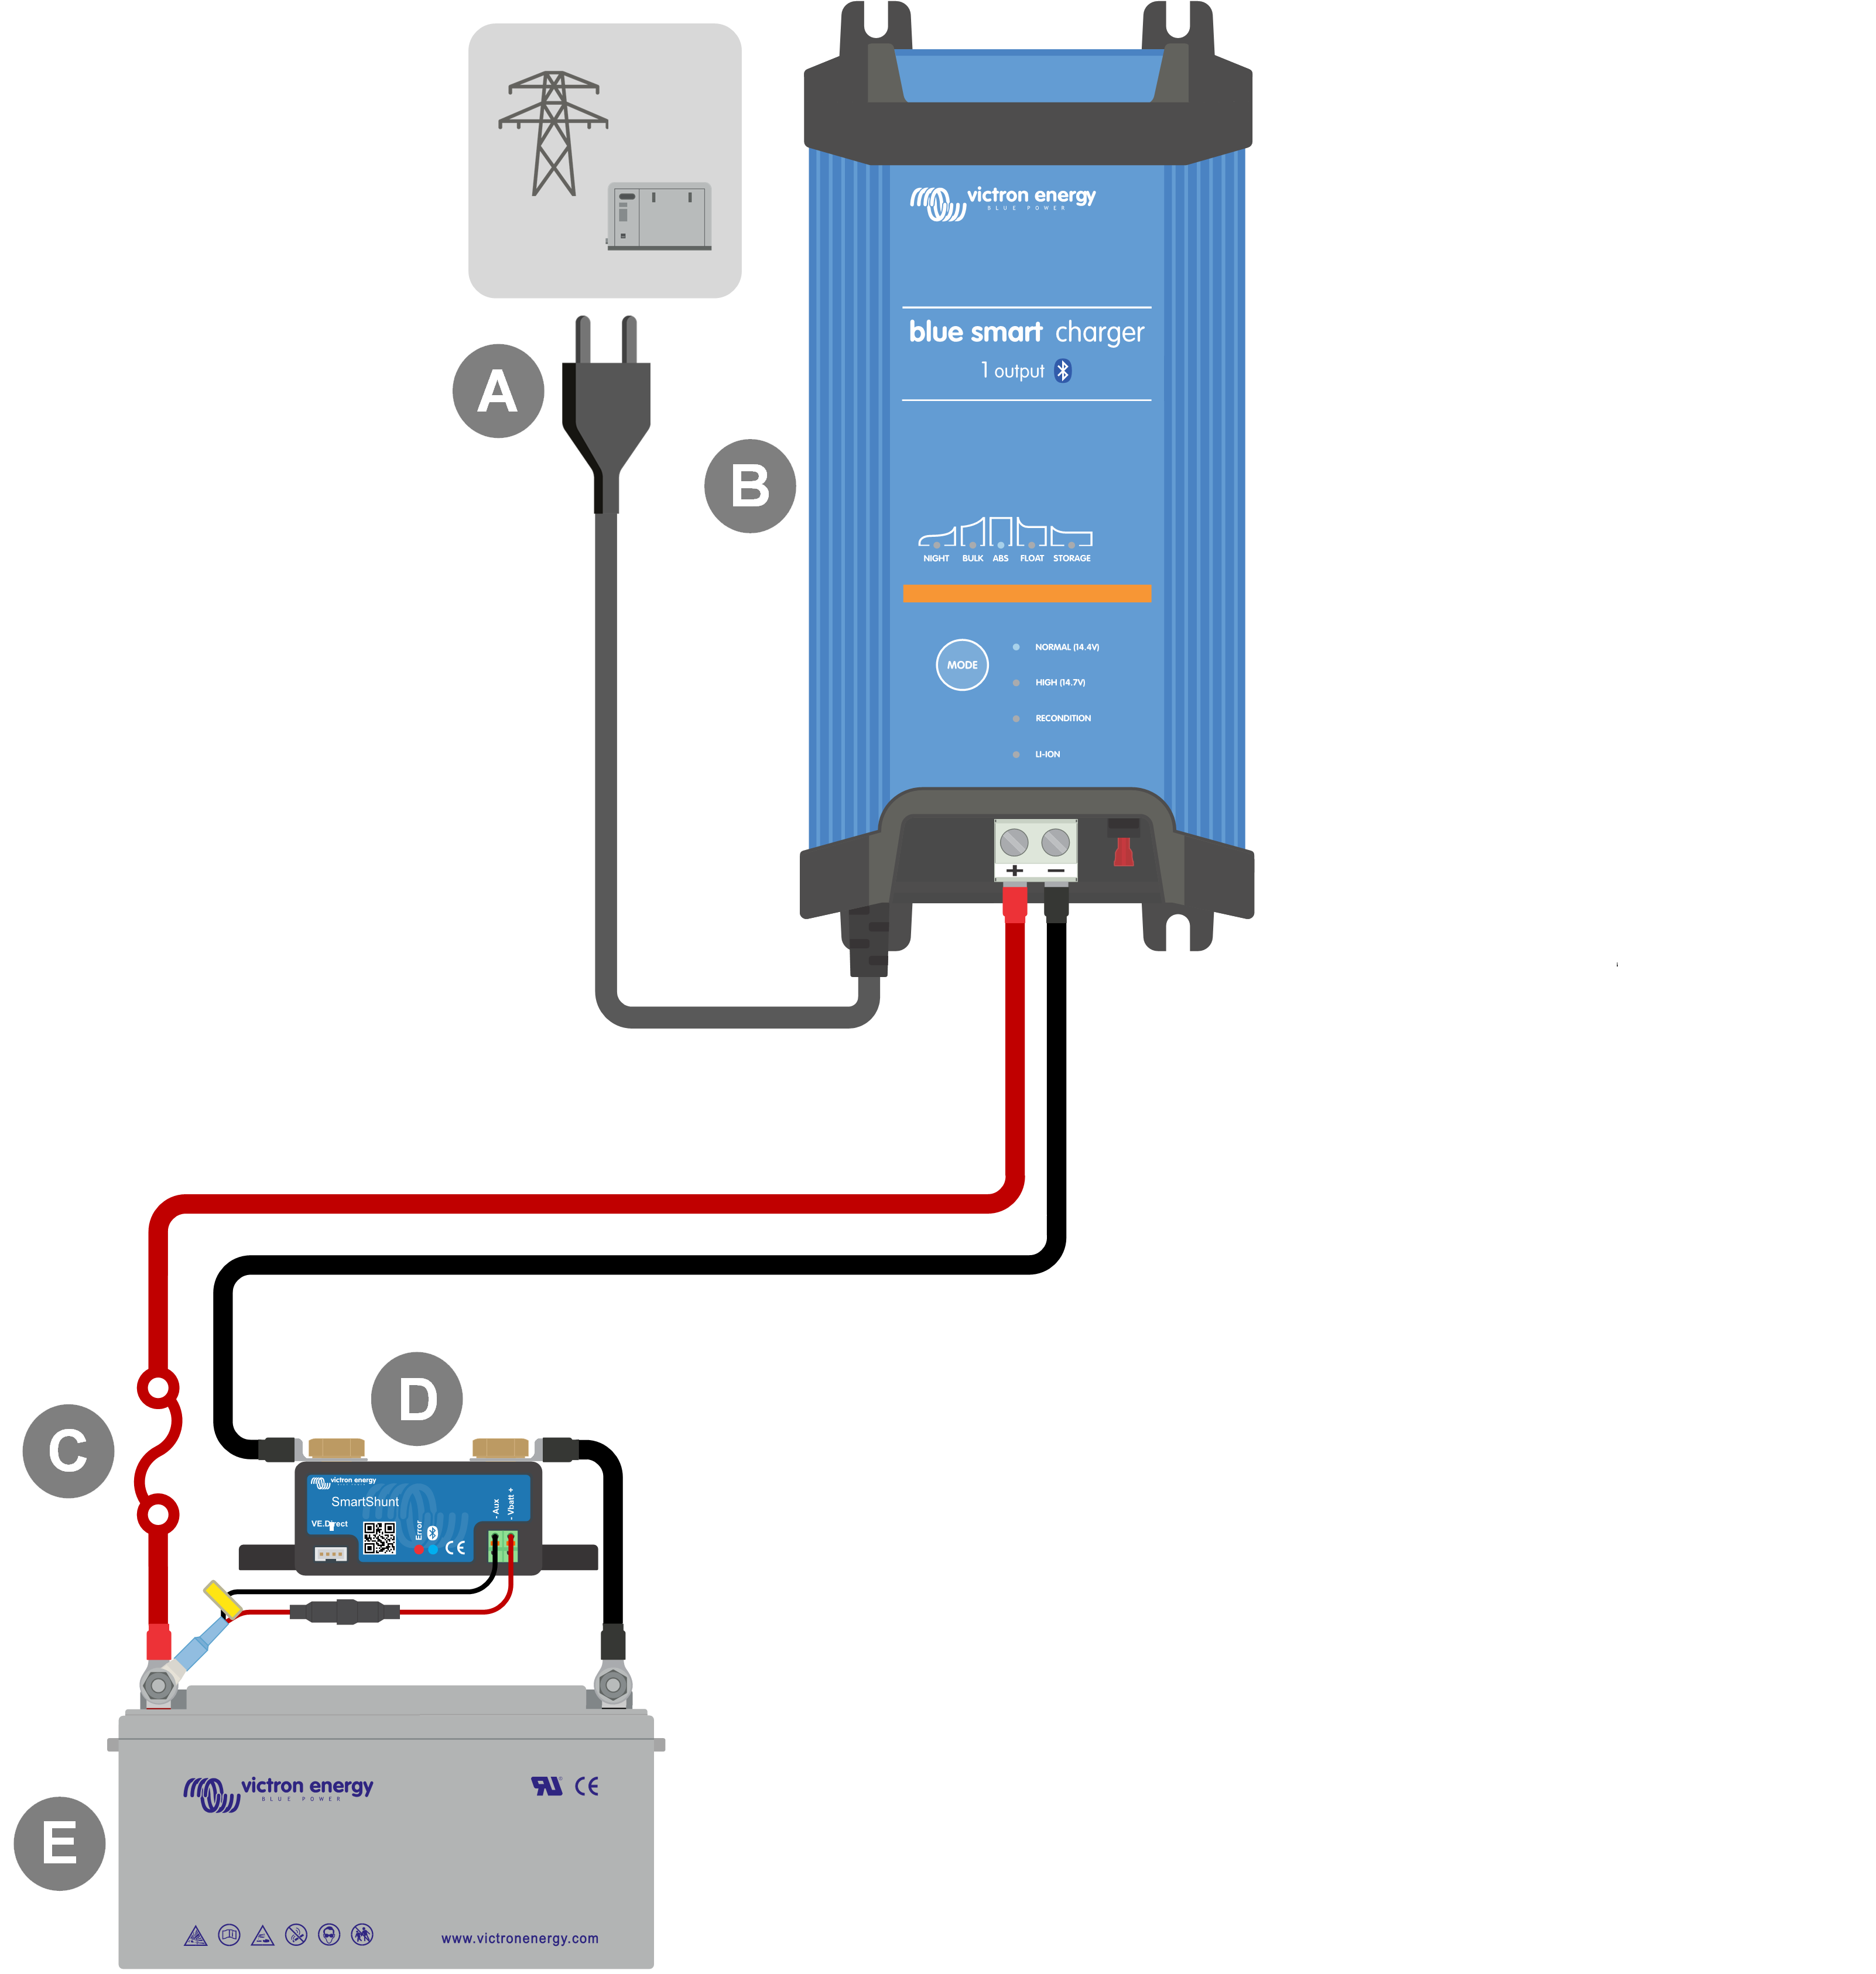
Légende | Description |
|---|---|
A | Alimentation CA (réseau électrique, générateur ou convertisseur) |
B | Blue Smart IP22 Charger (modèle à 1 sortie) |
C | Fusible/disjoncteur (à placer aussi près que possible de la batterie) |
D | SmartShunt ou shunt du contrôleur de batterie BMV (à placer aussi près que possible de la batterie, illustré avec la sonde de température en option réf. : ASS000100000) |
E | Batterie/parc de batteries |
Avis
Un réseau VE.Smart doit être configuré entre le Blue Smart IP22 Charger et le SmartShunt ou le contrôleur de batterie BMV pour permettre la connectivité Bluetooth et la communication entre les appareils ; reportez-vous à la section « Configuration avancée > VE.Smart Networking » pour plus d’informations.
Reportez-vous au schéma de câblage ci-dessous pour connecter le Blue Smart IP22 Charger (modèle à 3 sorties) à plusieurs batteries/parcs de batteries indépendants avec un SmartShunt ou un contrôleur de batterie BMV :
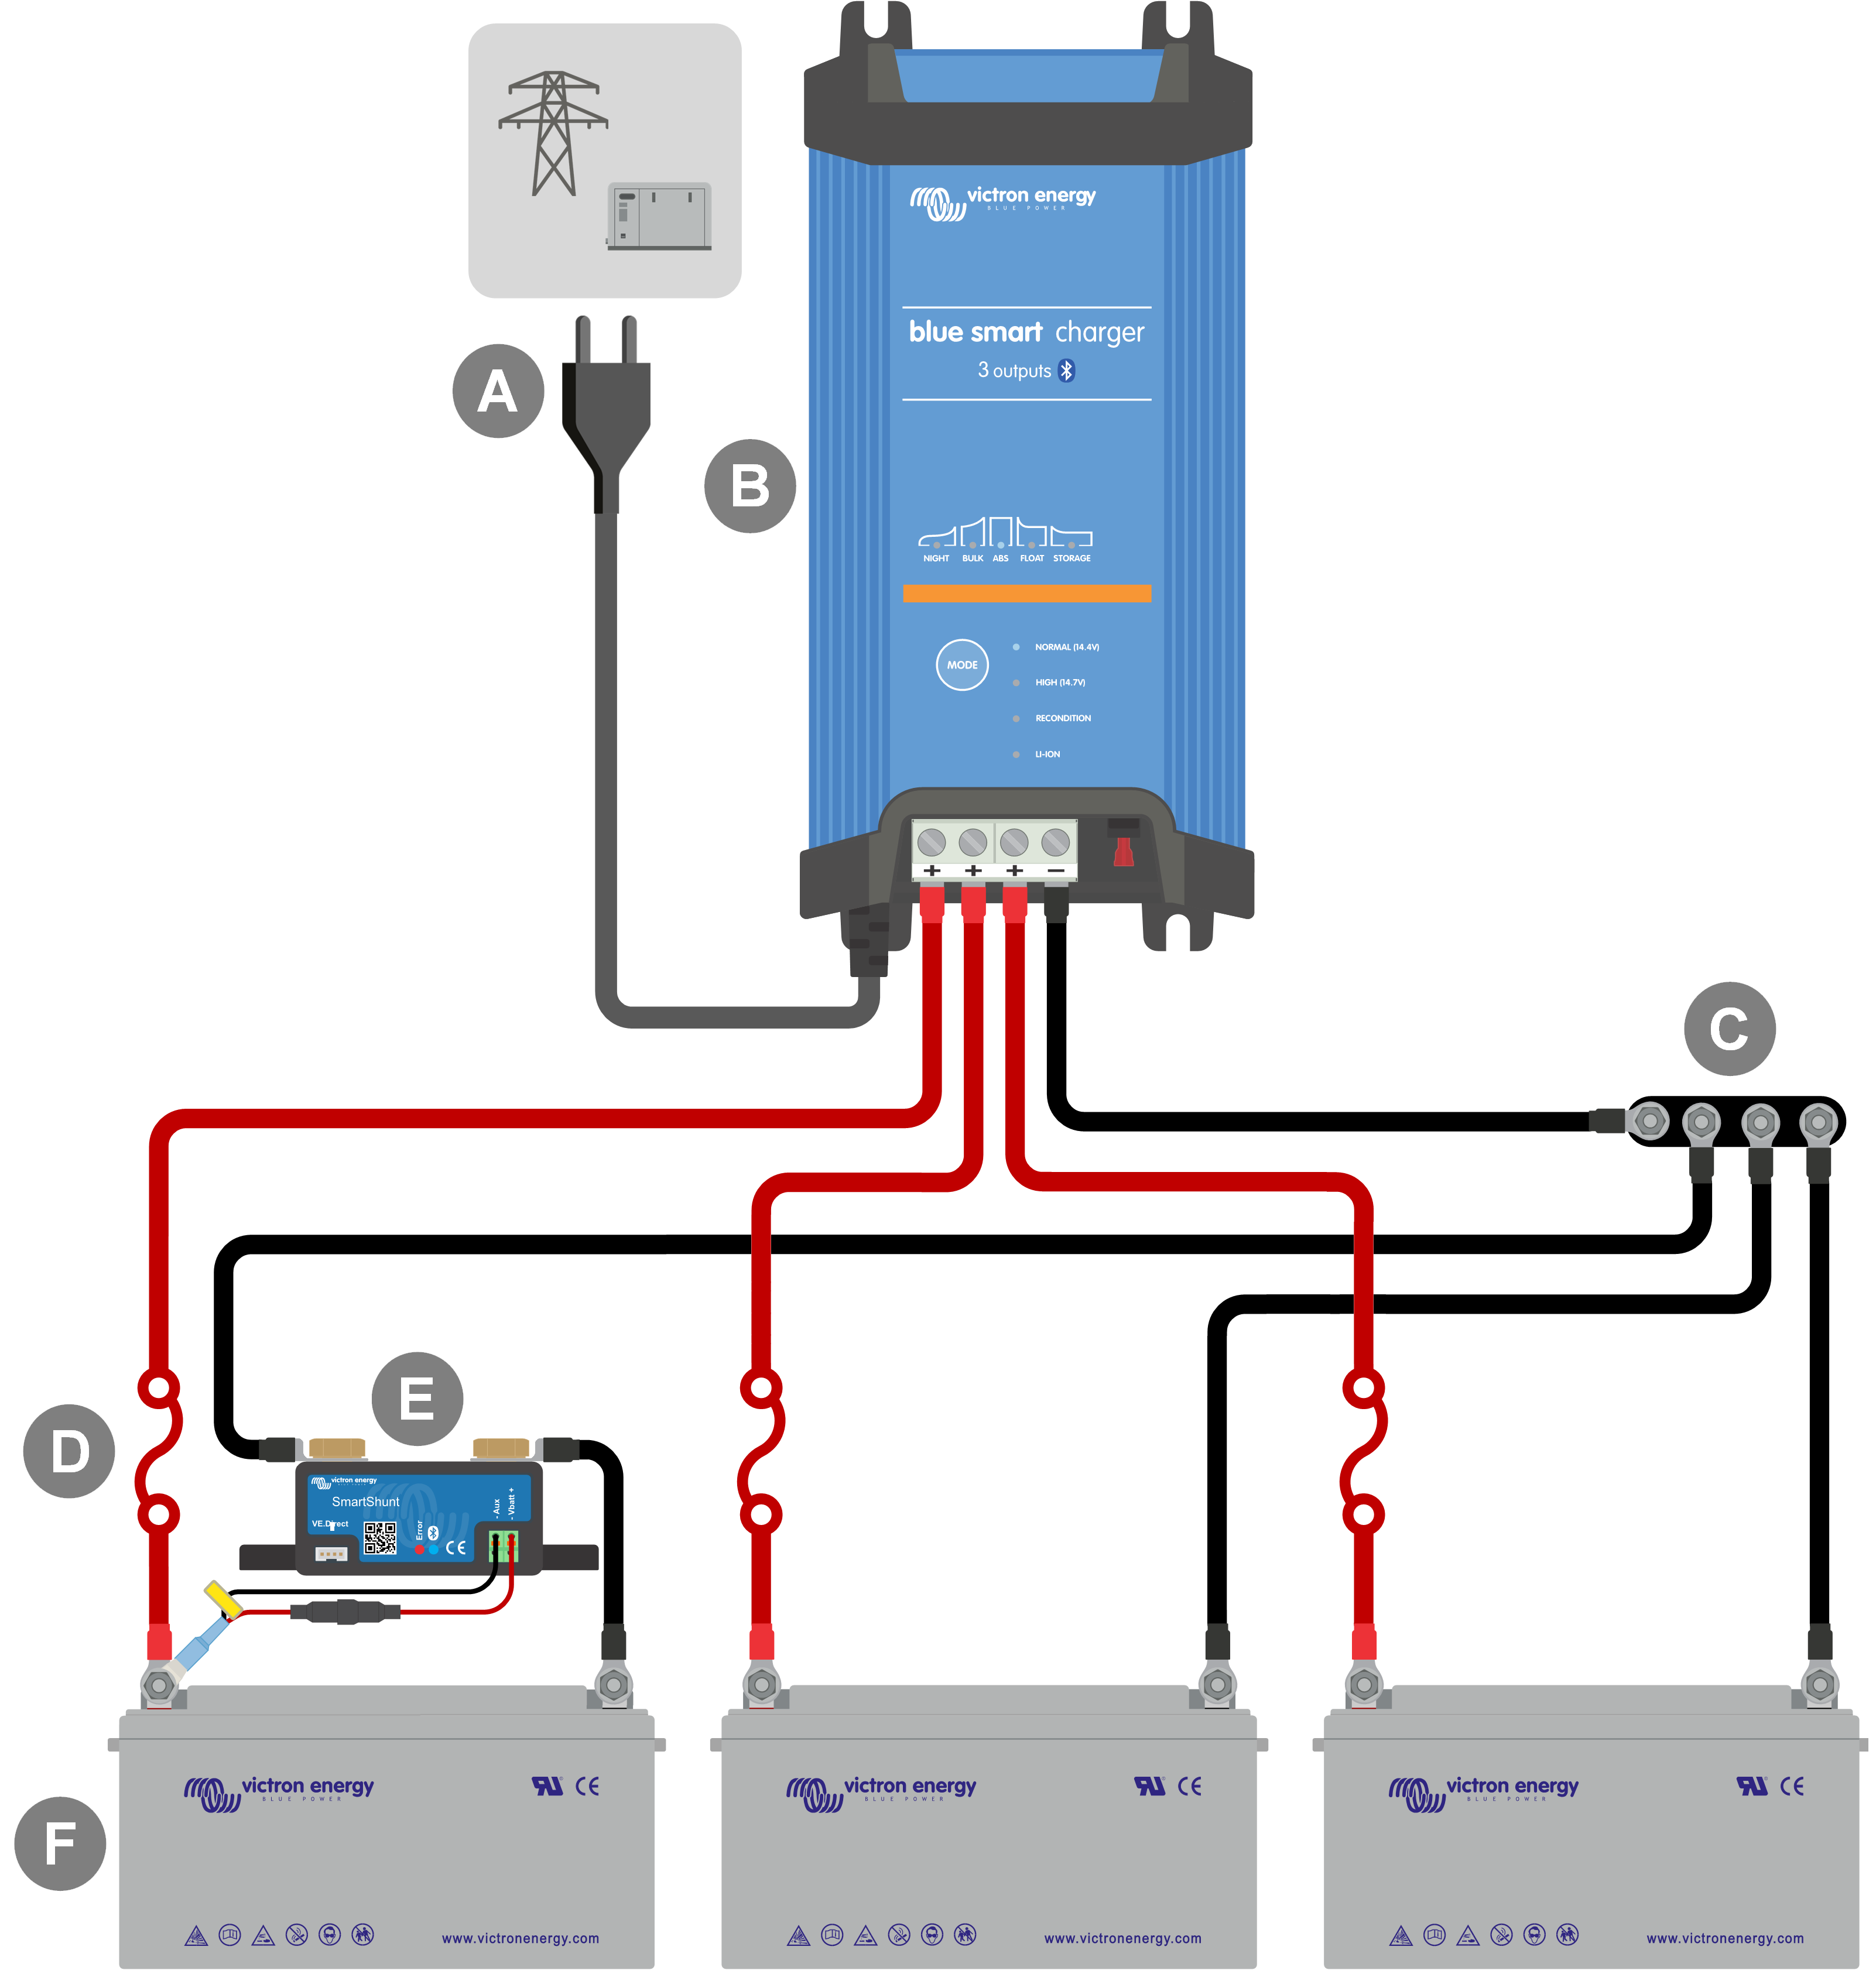
Légende | Description |
|---|---|
A | Alimentation CA (réseau électrique, générateur ou convertisseur) |
B | Blue Smart IP22 Charger (modèle à 3 sorties) |
C | Barre omnibus négative CC |
D | Fusibles/disjoncteurs x 3 (à placer aussi près que possible des batteries) |
E | SmartShunt ou shunt du contrôleur de batterie BMV (à placer aussi près que possible de la batterie, illustré avec la sonde de température en option réf. : ASS000100000) |
F | Batteries/parcs de batteries x 3 (toute combinaison de 1, 2 ou 3 batteries) |
Avis
Un réseau VE.Smart doit être configuré entre le Blue Smart IP22 Charger et le SmartShunt ou le contrôleur de batterie BMV pour permettre la connectivité Bluetooth et la communication entre les appareils ; reportez-vous à la section « Configuration avancée > VE.Smart Networking » pour plus d’informations.