After initial connection, the GX Tank 140 requires some basic configuration through the 'Settings' menu of the GX Device, which can be accessed via the display of the GX device, or via Remote Console on LAN or VRM.
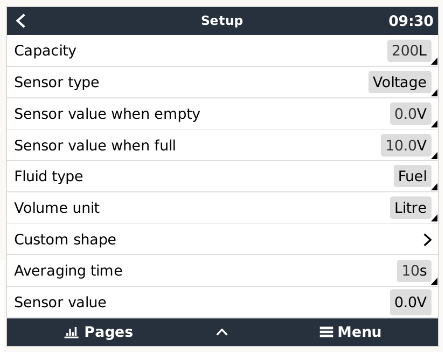
Sensor type - Voltage or Current
The GX Tank 140 can be used with either voltage or current output tank sensors; select the 'Sensor type' being used.
A combination of both sensor types can be used with the same GX Tank 140 unit, and configured independently (Voltage is the default 'Sensor type' setting).
Setting the wrong 'Sensor type' will not damage the GX Tank 140.
Sensor value when empty / full
Used to configure the functional operating range of the sensor.
Fluid type
Select from Fuel, Fresh water, Waste water, Live well, Oil and Black water. The selection automatically determines the icons and colors used in the display.
In case no specific tank 'Name' is configured, the 'Fluid type' is shown instead.
Volume unit
Select from Litre, Cubic meter, Imperial gallon and U.S. gallon.
Custom shape
It is possible to configure custom shapes for non-linear shaped tanks using this setting.
For example: if a tank that is wider up top, the tank shape can be configured so that a sensor reading of 50% equals only 25% of volume.
Up to 10 positions can be set to accurately describe the relationship between sensor reading and tank shape, even for highly irregular tanks. The tank volume is linearly interpolated between positions.
Averaging time
The averaging time setting is used to dampen the effect of dynamic fluid movement within the tank.
Set the averaging time as required between 1 and 60 seconds (10 seconds is the default 'Averaging time' setting).
Sensor value
This field entry shows the current/raw sensor reading, without any averaging; used mainly for troubleshooting.
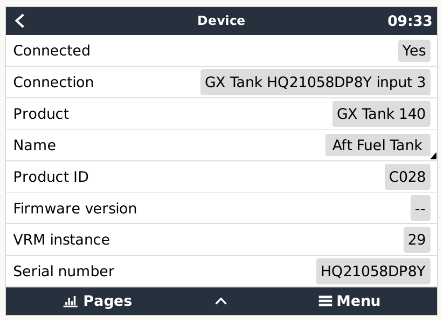
The 'Device menu' includes identification information in relation to the GX Tank 140 device and also each particular channel/tank.
Name
The 'Name' setting is used to allocate a custom tank name to each tank for easy identification while monitoring.
VRM Instance
The 'VRM instance' number is mapped to the instance on the VRM Portal.
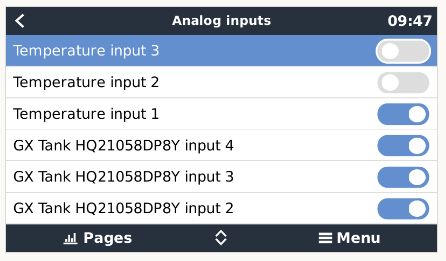
Each of the four tank channel inputs can be enabled and disabled via the 'Settings' > 'I/O' > 'Analog Inputs' menu.
By default all four tank channels are enabled. Disable the tank channel inputs that are not in use, to remove unnecessary clutter from the 'Device list'.
After disabling, use the 'Remove disconnected devices' option at the bottom of the 'Device list' to complete the removal, without the need to reboot the GX device.
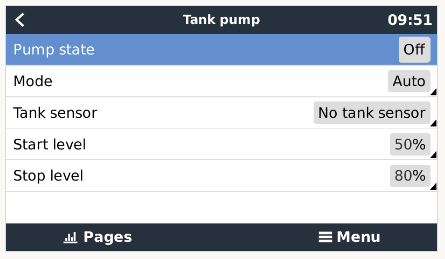
The tank level can be used to automatically run a pump (for example to automatically replenish a day-tank), this functionality is configured within the 'Tank pump' menu.
First the relay function must be set to 'Tank pump', this is changed in the 'Settings' > 'Relay' menu.
Then access the 'Settings' > 'Tank pump' menu, select the desired sensor and configure the desired start/stop levels.
When set to 'Auto' mode, the pump will run automatically once the tank volume % falls below the configured 'Start level' and stop automatically once the tank level increases above the configured 'Stop level'.
The pump 'Mode' can be easily toggled between 'Auto', 'On' and 'Off' as required.
Tank levels and Tank pump status is also available on the 'Boat and motorhome overview' page (which needs to be enabled in the 'Settings' > 'Display and language' menu):
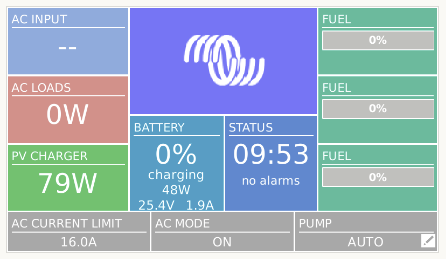
It is also possible to change the pump 'Mode' (between 'Auto', 'On' and 'Off') directly via the 'Boat and motorhome overview' page.