Quick start guide
Mount the Blue Smart IP22 Charger vertically (with terminals facing down) on a non-flammable substrate; secure using the 4 mounting holes on the base. Ensure there is at least 10cm of clearance below and above the charger for airflow/cooling.
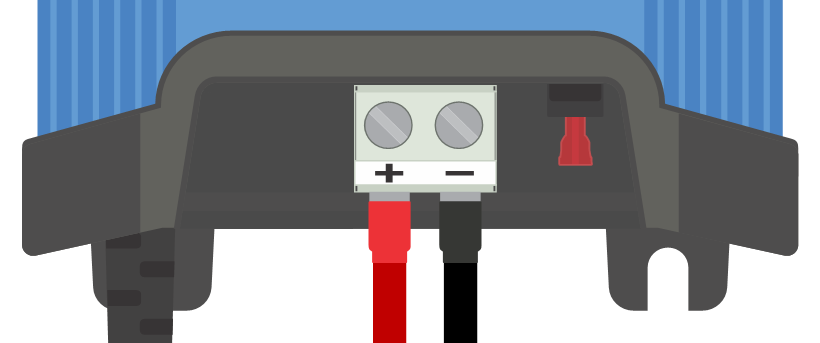
Connect DC power cabling between the Blue Smart IP22 Chargers BATTERY terminals (located under the bottom cover) and the battery or DC system distribution bus.

Ensure that the DC system is fully shut down (all DC loads and charge sources off/isolated) prior to disconnection of any existing battery/DC system distribution bus cabling and connection of the charger to the battery terminals/DC system distribution bus.
Use flexible multi stranded copper DC power cable with sufficient cross sectional area, inline with an appropriate fuse or circuit breaker.
Ensure that wiring polarity is correct; use red cabling for the + (positive) connections and black cabling for the - (negative) connections.
Torque the terminal screws to 2.4Nm using a small torque wrench with a suitable screw driver bit, and reinstall the lower connection cover.

Connect the AC power cable to a mains power outlet; after a short delay, the LEDs indicating the current charge mode and charge state will illuminate.

Select the charge mode and charge current limit most appropriate for the battery type and capacity.
Setup using the charger:
Select the most appropriate mode from the integrated charge presets (Normal, Normal + Recondition, High, High + Recondition or Li-ion) by briefly pressing the MODE button on the charger to cycle through each option; the LED beside the currently selected charge mode (NORMAL / HIGH / LI-ION) will be illuminated, as well as the RECONDITION LED if enabled.
Ensure that recondition stage is only enabled when required, as unnecessary or overuse will reduce battery life.
If required, enable low current mode (charge current limited to 50% of the maximum rated charge current and disabled fan); to enable (or disable) low current mode depress and hold the MODE button for 6 seconds, when enabled the NIGHT LED will blink.
Alternatively night mode can be enabled, which temporarily activates low current mode for a period of 8 hours (typically overnight to eliminate fan noise); to enable (or disable) night mode depress and hold the MODE button for 3 seconds, when enabled the NIGHT LED will be illuminated.

Setup using Bluetooth:
Using a Bluetooth enabled device (such as a mobile phone or tablet), open the VictronConnect app and locate the Blue Smart IP22 Charger in the LOCAL page, then connect to the device (default Bluetooth PIN Code is 000000).
Select the ‘Setting’ icon (gear in the top right corner) to access the 'Settings' page.
Select the most appropriate mode from the integrated charge presets (Normal, Normal + Recondition, High, High + Recondition or Li-ion) in the 'Charge preset' menu; the LED beside the currently selected charge mode (NORMAL / HIGH / LI-ION) will be illuminated, as well as the RECONDITION LED if recondition stage is enabled.
Ensure that recondition stage is only enabled when required, as unnecessary or overuse will reduce battery life.
If required, enable low current mode (charge current limited to 50% of the maximum rated charge current and disabled fan); to enable (or disable) low current mode select the required option from the 'Charge current' menu, when enabled the NIGHT LED will blink.
Alternatively night mode can be enabled, which temporarily activates low current mode for a period of 8 hours (typically overnight to eliminate fan noise); to enable (or disable) night mode toggle the 'Night mode' switch on (or off to disable), when enabled the NIGHT LED will illuminate.

The charger will automatically store the selected charge mode and recall it for future charge cycles (even after being disconnected from power).
When the ABS LED is illuminated the charger has moved into absorption stage (bulk stage is complete); the battery will be approximately 80% charged (or >95% for Li-ion batteries) and may be returned into service if required.
When the FLOAT LED is illuminated the charger has moved into float stage (absorption stage is complete); the battery will be fully (100%) charged and is ready to be returned into service.
When the STORAGE LED is illuminated the charger has moved into storage mode (float stage is concluded); to maintain the battery at full charge, the battery can be left on continuous charge for an extended duration.
To stop charging isolate the power supply to the AC power cable.