1. General
Product, system and fault information | |
|---|---|
Date | .... |
Model | .... |
Part number | .... |
Serial number | .... |
Date of installation (if known) | .... |
Date of failure (if known) | .... |
VRM site name or ID (if applicable) | .... |
Battery type, brand name and overall capacity (if known) | .... |
Solar array power rating (W) | .... |
Solar array maximum open-circuit voltage (V) | .... |
2. Initial check
Initial check | |||
|---|---|---|---|
Does the unit have mechanical damage to its housing? |
| ||
Does the unit have burn marks or melting marks on its housing? |
| ||
Does the unit have mechanical or burn damage to its electrical connectors? |
| ||
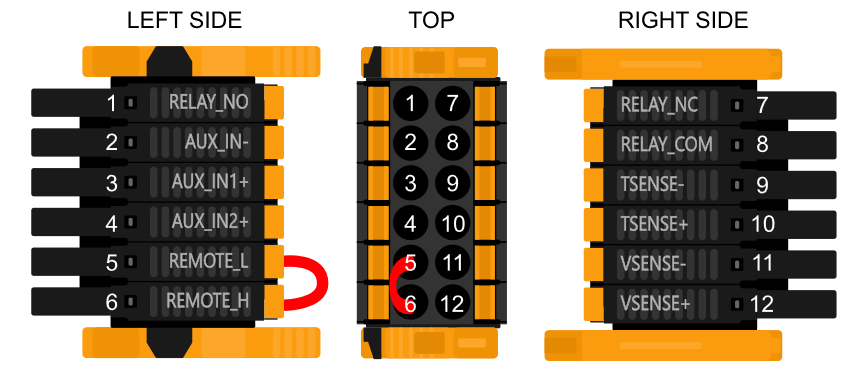
For models with a remote link only:
|
| ||
3. Latching relay check
Latching relay check | |
|---|---|
Is the unit equipped with red safety latching relays near the PV connections as indicated in the below image? 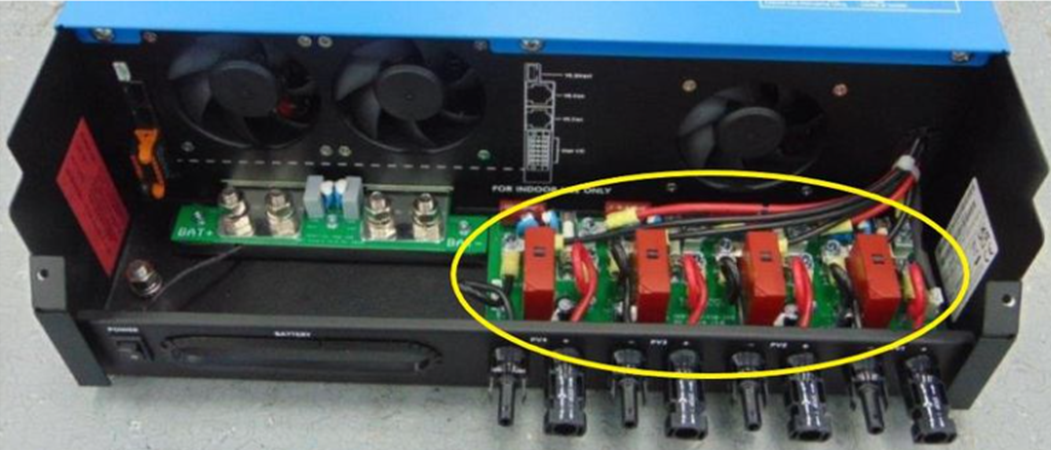 |
|
Indicate the position of the relays from left to right. CautionDO NOT manually operate or reset the levers. If the lever is in a closed position, this indicates a safety trip because of a (warrantable) fault. 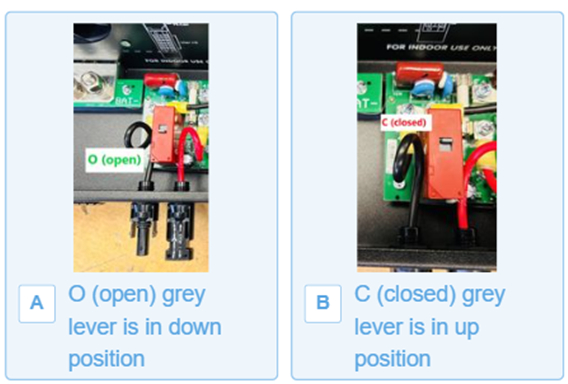 |
|
Are any of the levers in the closed position (lever is up)? |
|
4. First power up
Power up check | |
|---|---|
Power the solar charger by using a bench power supply set to 48V and a current limit of 0.5A, connected to the battery terminals. Alternatively, use a 48V battery with a 0.5A fuse in the positive supply. Does the unit turn on? |
|
In case the unit did not turn on, check and rectify (if needed) the following:
Does the unit turn on now? |
|
Does the display indicate an error? If so, write it down: .................................................................................................................. .................................................................................................................. .................................................................................................................. .................................................................................................................. |
|
5. Bluetooth
Bluetooth check | |
|---|---|
Is Bluetooth active, i.e., do you see the unit listed in the device list of the VictronConnect app? |
|
If Bluetooth is not active, it is unlikely to be a faulty Bluetooth module. More likely, Bluetooth has been turned off in the VictronConnect settings. To re-activate Bluetooth:
Is Bluetooth active now? |
|
If Bluetooth is still not active, rule out the following:
Is Bluetooth active now? |
|
6. Firmware and settings
Update the firmware and reset the settings to default | |
|---|---|
Connect via an interface (or Bluetooth) to the VictronConnect app and navigate to the unit. Is this possible? |
|
Check if the firmware is up to date. If the firmware is not up to date, update the firmware to the most recent version using the VictronConnect app:
NoticeNote that when connected via Bluetooth, both the solar charger and the BLE module needs to be up to date. If connecting via VE.Direct, only the solar charger needs to be up to date. |
|
Save the unit's settings. File the settings under its serial number and keep the file on record for future reference. To save the settings:
|
|
Reset all settings to default:
|
|
Does the VictronConnect app display any active error codes? If so, try to resolve the errors by consulting the product manual. Did it get resolved? |
|
If there is an active error, write down the error number(s) and name(s). Use this form's "Remarks" section if more space is needed. | Error number: .... Error name: .... |
Check the history. Were there any historical errors? If so, write them down. Save a copy of the history file for your reference. |
|
Check the history tab. What was the highest PV voltage recorded? Compare this to the rated maximum PV voltage of the solar charger. Has the PV voltage been higher than 450V? |
|
Check the trents tab. Does it contain data? |
|
7. Functionality
Solar charger functionality check | |
|---|---|
Prepare the solar charger for the functionality test:
NoticeSkip this section step if you cannot provide a 120VDC to the PV terminals. |
|
Measure the voltage on the solar charger PV terminals. Compare this to the solar voltage as indicated in the VictronConnect app. Are they both the same? A small deviation is allowed due to measurement inaccuracies. |
|
Measure the voltage on the solar charger battery terminals. Compare this to the battery voltage as indicated in the VictronConnect app. Are they both the same? A small deviation is allowed due to measurement inaccuracies. |
|
Is the battery being charged? Check if the solar charger is progressing through the bulk, absorption and float charge stages. Is this the case? Background information: Charging begins when the PV voltage reaches at least 120V and continues as long as it stays above 65V. |
|
Force the solar charger to provide more charge current by connecting it to an empty battery or by switching on a large DC load connected to the same battery. Is the unit able to provide its full current rating? |
|
Measure the charge current with a DC current clamp. Is the charge current the same as indicated in the VictronConnect app? A small deviation is allowed due to measurement inaccuracies. |
|
While the solar charger is providing the full current, measure the battery voltage. Compare this to the voltage as indicated in the VictronConnect app. Do the voltages deviate less than 3% from each other? |
|
8. Remarks
Provide additional fault information or add issues not already covered in earlier questions |
|---|
.... |
.... |
.... |
.... |
9. RMA lodgement
For your information purposes, provide details after lodging the RMA | |
|---|---|
RMA type: |
|
RMA lodgement date | .... |
Victron Energy RMA number | .... |
Your reference number | .... |